Embarking on the journey of capturing the human form is one of art's most profound and rewarding challenges. It’s a pursuit that demands not just observational skill but also an intimate understanding of your tools. Mastering the materials & techniques in figure drawing unlocks a world of expressive potential, allowing you to translate the dynamic energy, subtle nuances, and inherent beauty of the human body onto your chosen surface. This guide is your compass, navigating the essential implements and proven methods that empower you to create compelling and lifelike figures, moving beyond mere representation to genuine artistic expression.
At a Glance: Key Takeaways for Figure Drawing
- Diverse Materials: Choose from graphite for precision, charcoal for expressiveness, or Conté crayons for unique textures, matching your media to your artistic intent.
- Paper Matters: Experiment with smooth, toothy, or toned papers to find the perfect surface for your chosen medium and desired effects.
- Anatomy is Your Ally: A fundamental understanding of muscles, bones, and proportions is crucial for realistic and believable figures, even when stylized.
- Observation is King: Drawing from life (live models) offers invaluable insights into form, light, and movement that cannot be replicated by photos alone.
- The Drawing Process: Follow a structured approach: gesture, line of action, basic forms, outline, then careful shading to build dimension.
- Practice Makes Perfect: Regular gesture drawing, varied references, and studying masterworks are non-negotiable for skill improvement.
- Embrace Experimentation: Don't be afraid to try different techniques and materials to develop your unique artistic voice.
The Enduring Allure of the Human Form
For centuries, the human figure has stood as a central subject in art, a testament to its profound symbolic power and aesthetic complexity. From the idealized forms of ancient Greek sculpture to the anatomical precision of Renaissance masters like Leonardo da Vinci and Michelangelo, artists have sought to capture its grace, strength, and vulnerability. Figure drawing, in particular, was and remains a cornerstone of traditional art training, a rigorous discipline that hones an artist's ability to observe, understand, and depict the world around them.
Today, figure drawing continues to be fundamental, whether in classical realism, which strives for realistic depiction, or in contemporary art, where it serves as a springboard for abstract and expressive interpretations. The goal isn't just technical accuracy; it’s about conveying emotion, narrative, and the very essence of human experience through line, form, and shadow. It's about learning to see, and then learning to translate that seeing into a language others can understand and feel.
Your Essential Toolkit: Materials for Figure Drawing
Before you even make your first mark, selecting the right materials is paramount. Each medium offers unique qualities that can dramatically influence the mood and outcome of your drawing.
Drawing Surfaces: The Foundation of Your Art
The paper you choose is more than just a blank slate; it's an active participant in your drawing process.
- Newsprint: Inexpensive and plentiful, newsprint is ideal for rapid-fire gesture drawing exercises. Its absorbency is great for charcoal and soft pencils, though it yellows quickly and isn't archival. It's the perfect training ground for quantity over permanence.
- Drawing Paper (Cartridge Paper): A step up, often available in pads of various weights and tooth (texture). A medium-weight, acid-free drawing paper (like 60-80 lb) is a versatile choice for practice and more refined studies with graphite, charcoal, or Conté.
- Bristol Board: With its smooth, hard surface, Bristol board is excellent for fine detail, ink work, and graphite drawings where crisp lines and minimal texture are desired.
- Toned Papers: Grey, tan, or sepia-toned papers offer a mid-range value, allowing you to work both darker and lighter than the paper itself. This encourages thinking about light and shadow more dynamically and can add a sophisticated touch to your figure studies, especially with charcoal or Conté.
Drawing Instruments: Your Voice on Paper
Each drawing tool brings a distinct character to your line and shading. Experimentation is key to discovering your favorites.
- Graphite Pencils: The workhorse of drawing. Graphite pencils range from hard (H) to black (B) grades.
- H Grades (e.g., 2H, 4H): Harder leads, lighter marks, great for initial light sketches, precise details, and subtle rendering. They hold a sharp point well.
- HB: The perfect middle ground, good for general drawing.
- B Grades (e.g., 2B, 4B, 6B, 8B): Softer, darker leads that produce rich blacks. Excellent for shading, broad strokes, and creating deep contrast. They dull faster and can smudge more easily.
- Tip: Start with a lighter H pencil for your initial structural lines and build up with softer B pencils for shading and darker values.
- Charcoal: The master of dramatic effect, charcoal offers rich darks and expressive freedom.
- Vine Charcoal: Soft, easily erasable, and creates light, delicate marks. Perfect for initial gesture drawings and establishing broad value areas without commitment.
- Compressed Charcoal: Denser and darker, available in sticks or pencils. It produces intense blacks and is great for creating strong contrasts and deep shadows. Compressed charcoal pencils offer more control for detail than stick form.
- Consideration: Charcoal can be messy but is unmatched for its velvety blacks and ability to create a wide range of values.
- Conté Crayons: Made from compressed pigment and clay, Conté crayons offer a distinct earthy palette (sanguine, sepia, bistre, white, black). They produce rich, matte marks with a unique texture, excellent for life drawing and adding warmth or antique feel to your figures.
- Colored Pencils: While often associated with illustration, a limited palette of colored pencils can add subtle hues and precise details to your figure drawings, especially for skin tones or specific clothing textures.
- Ink (Optional): For those seeking crisp lines and high contrast, ink pens (like Micron pens for precision or brush pens for varying line weight) can add a bold, graphic quality. Washes of diluted ink can also create atmospheric effects and deep shadows.
Erasers & Blending Tools: Refinement and Subtlety
These tools aren't just for fixing mistakes; they're integral to creating nuance and form.
- Kneaded Eraser: A pliable, putty-like eraser that lifts graphite or charcoal instead of abrading the paper. It's excellent for softening lines, pulling out highlights, and cleaning up smudges without damaging the paper's surface. You can shape it to precise points.
- Plastic Eraser: A firmer eraser (like a Staedtler Mars Plastic) that removes marks cleanly and completely. Best for precise cleanup or correcting strong lines.
- Tortillons & Blending Stumps: Tightly rolled paper tools used to blend graphite or charcoal smoothly, creating seamless transitions between tones and giving a painterly effect. Tortillons are smaller and more pointed; stumps are larger.
- Chamois Cloth: A soft piece of leather used primarily with charcoal to create smooth, even tones over large areas.
Mastering the Blueprint: Understanding Anatomy and Proportion
Creating a convincing figure drawing, whether realistic or stylized, hinges on a foundational understanding of the human body. This isn't about becoming a medical illustrator, but about appreciating how muscles and bones dictate form and movement.
Why Anatomy Matters Beyond Memorization
Knowing where muscles attach and how bones articulate allows you to draw with conviction. You'll understand why a certain crease forms, how a limb rotates, or where weight naturally settles. This anatomical literacy helps you avoid common pitfalls like stiff poses or illogical forms, giving your figures a sense of life and believability. It’s the invisible framework that supports the visible surface.
Fundamental Proportions: A Visual Guide
While every individual has unique proportions, there are universally accepted guidelines that artists use as a starting point. The human body is often measured in "head units," with the head serving as a modular measurement.
- Adult Figure: Roughly 7.5 to 8 heads tall.
- Mid-point: Typically around the pubic bone.
- Elbow: Lines up with the navel.
- Wrist: Roughly aligns with the crotch.
- Knees: Fall about two head-lengths from the bottom of the feet.
These are general rules, not strict laws. Observing real figures and practicing with these ratios will help you internalize them, allowing for expressive deviations later on. Leonardo da Vinci's "Vitruvian Man" famously explored these ideal proportions, emphasizing the harmony between the human figure and geometric principles.
Simplifying Forms: Building from the Inside Out
Before adding intricate details, learn to break down the complex human form into simpler, geometric volumes: spheres for joints, cylinders for limbs, and boxes for the torso and pelvis. This "block-in" method helps establish volume, spatial relationships, and foreshortening more accurately, providing a robust structure before you refine the contours. Think of it as building a sculpture from basic clay masses before carving the details.
Drawing from Life and Reference: Sharpening Your Eye
The most effective way to improve your figure drawing skills is through direct observation. This means engaging with live models, photographic references, and even poseable mannequins, each offering unique benefits.
The Power of Life Drawing
Working from a live model is, without question, the gold standard. A living, breathing human offers an endless array of subtleties that no photograph can fully replicate: the gentle shift of weight, the play of light across three-dimensional forms, the micro-expressions of gesture. Attending life drawing classes at art schools or community centers provides invaluable practice in capturing gesture, understanding planes, and observing the figure in natural, dynamic light. It forces you to make quick decisions and trust your instincts.
Leveraging Reference Images
A vast repository of reference photographs and videos is available online, providing access to an incredible diversity of poses, body types, and lighting conditions. These are excellent for studying specific anatomical details, challenging poses, or for artists who don't have regular access to live models. Remember, however, that photos flatten reality, so use them as a guide, not a substitute for understanding form in three dimensions.
The Utility of Mannequins
Poseable wooden or plastic mannequins offer a convenient way to set up basic poses and study lighting. While they lack the organic subtleties of a human figure, they can be useful for understanding fundamental proportions and range of motion. Supplementing mannequin studies with photographic references for anatomical details will yield the best results.
The Art of Sighting and Measuring
Accuracy in proportion is paramount for convincing figure drawings. The technique of sighting and measuring is crucial. By holding a pencil or brush at arm's length, you can compare the relative sizes and angles of different parts of your reference or model. For instance, you can measure the head's height against the total height of the body, or compare the width of the shoulders to the length of an arm.
- Pencil Method: Hold your pencil horizontally to gauge angles (e.g., shoulder tilt, hip tilt). Hold it vertically to compare heights.
- Thumb Method: Use your thumb on the pencil to mark lengths and transfer those measurements to your paper.
- Gridding: For very precise work, you can lightly draw a grid over your reference and a corresponding grid on your paper to help place elements accurately.
This constant comparison helps train your eye and translate observed reality onto your two-dimensional surface.
The Figure Drawing Process: A Step-by-Step Approach
While artists develop their own unique workflows, a general process provides a solid framework for approaching figure drawing, ensuring you build your figure logically and confidently.
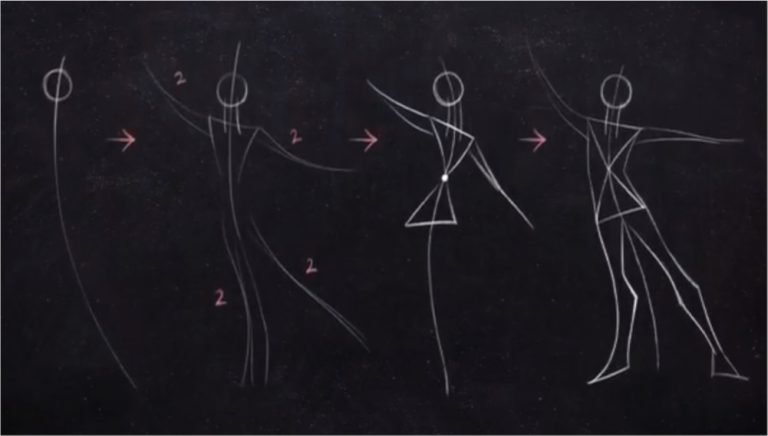
1. Capturing the Gesture: The Soul of the Pose
The very first step is often the most important: a gesture drawing. This isn't about anatomical perfection or precise lines; it's about rapidly capturing the energy, rhythm, and overall movement of the figure. Use loose, flowing lines to define the top and bottom of the figure, then a quick vertical and horizontal halfway line to establish your spatial framework. This initial sketch should be quick, energetic, and expressive, often completed in 2-5 minutes per pose. It sets the emotional tone and dynamism for the entire drawing.
2. Finding the Line of Action: The Spine and Balance
Building on the gesture, establish the line of action. This is an imaginary curve that flows through the figure, often following the spine's angle and extending through the torso to the leg supporting the figure's weight. It communicates body positioning and weight displacement. Once the line of action is in place, you can add horizontal lines to indicate the tilt of the shoulders, hips, and knees. This network of lines forms the structural backbone upon which your figure will be built.
3. Establishing Core Forms & Proportions: Blocking In
Now, start to block in the primary volumes. Think of the head, ribcage, and pelvis as simplified, intersecting forms. Connect these major masses with cylinders for the limbs. At this stage, you're focusing on accurate proportions and the overall mass and placement of the figure within your composition, using light, almost invisible lines. This is where your understanding of anatomy and basic geometric forms comes into play.
4. Defining the Outline and Shadow Masses: Connecting the Dots
With your structural framework in place, begin to draw the basic outline of the figure, connecting the mapped joints and angles. This is where you transition from internal structure to external contour. Simultaneously, start to identify and lightly block in the main shadow masses. Don't worry about rendering detail yet; simply separate the major areas of light from shadow. This helps you define the figure's three-dimensionality early on.
5. Bringing Form to Life with Shading: Light, Shadow, and Detail
This is where the figure truly comes alive. Begin by establishing the halftones – the mid-range values between pure light and pure shadow. Gradually build up the contrast by adding darker values in the shadow areas.
- Blending: Use a tortillon or blending stump to smoothly transition halftones into lighter areas and shadows into midtones. For charcoal, a chamois cloth can create incredibly soft, broad blends.
- Alternative Techniques: Experiment with cross-hatching (intersecting lines to create tone), hatching (parallel lines), or stippling (dots) to build value and texture. These techniques can add a distinct character to your shading, moving beyond smooth blending.
- Refinement: Continuously refine your light and dark areas, pushing contrasts where needed, and softening edges to create a sense of depth and atmosphere. Add details like subtle musculature, clothing folds, and facial features once the overall form and value structure are solid. Remember that shadows have internal variation; they aren't flat.
Beyond the Basics: Advanced Techniques and Expressive Choices
Once you've grasped the fundamentals, you can begin to explore more sophisticated techniques and develop a personal expressive style.
- Foreshortening: A powerful technique that creates the illusion of objects or limbs receding into space. It's challenging but adds immense dynamism to poses where parts of the body are coming towards or away from the viewer. Practice foreshortening by observing figures from extreme angles.
- Expressive Lines: Don't just draw lines; make them speak. Varying line weight, pressure, and speed can convey tension, softness, or energy. A confident, flowing line carries more impact than a timid, broken one.
- Textures and Clothing: Once the underlying figure is solid, think about how to depict different textures—the softness of fabric, the sheen of hair, the roughness of skin. Clothing should drape and fold according to the figure beneath, enhancing rather than obscuring the form.
- Experimentation: The best artists are perpetual students. Don't be afraid to try new materials, combine media, or push the boundaries of established techniques. That's how you discover your unique artistic voice.
Cultivating Your Figure Drawing Practice: Tips for Growth
Becoming proficient in figure drawing is a lifelong pursuit, demanding dedication and continuous learning. Here are strategies to refine your skills and deepen your understanding.
- Learn Anatomy (Continuously): It's not a one-time study. Regularly consult anatomy books or online resources. Understand the names and functions of major muscles and bones, but more importantly, internalize how they appear on the surface and influence movement.
- Refine Your Drawing Process: The steps outlined above are a guide. As you practice, you’ll discover what works best for you. Perhaps you prefer to block in tones earlier, or focus more on contour. Adapt and personalize your workflow.
- Practice Gesture Drawing Regularly: This cannot be overstressed. Short, timed gesture sessions (2-5 minutes) are incredible for developing your observational skills, understanding the "feeling" of a pose, and building confidence in your line.
- Work from a Variety of References: Don't rely solely on one type. Balance life drawing with studies from photographs, sculptures, and even your own imagination. Each type of reference trains a different aspect of your visual intelligence.
- Attend Life Drawing Classes: If possible, make life drawing a regular part of your practice. The experience of drawing from a live model is unparalleled for understanding form, light, and the subtleties of human movement.
- Study Artworks by Old Masters: Look at how Leonardo da Vinci, Michelangelo, Edgar Degas, and Egon Schiele approached the figure. Analyze their line work, their understanding of anatomy, their use of light and shadow, and how they conveyed emotion. Don't just admire; dissect their techniques.
- Maintain a Sketchbook and Commit to Regular Practice: Consistency is key. Even 15-30 minutes of drawing each day will yield significant improvement over sporadic, long sessions. Your sketchbook is your personal laboratory for experimentation and growth.
Exercises to Elevate Your Skill
To truly internalize the techniques and insights, structured exercises are invaluable.
- Timed Gesture Drawing Exercise: Set a timer for 2-5 minutes per pose. Focus solely on capturing the action, movement, and overall shape, ignoring details. Repeat with as many different poses as possible. This builds speed, confidence, and an intuitive sense of flow.
- Imagination Exercise: Challenge yourself to draw figures from memory or imagination without any references. Start with simple poses, then gradually attempt more complex ones. This exercise forces you to rely on your internal understanding of anatomy and proportion, revealing gaps in your knowledge and encouraging creative problem-solving.
- Challenge Yourself with Complexities: Incorporate foreshortening, dynamic twists, or figures in motion into your imaginative drawings. Try rendering complicated clothing, drapery, or challenging textures. Continuously push your boundaries and experiment with what you can achieve.
Your Next Step on the Artistic Journey
Figure drawing is a journey, not a destination. Each line you draw, each shadow you render, builds upon the last, deepening your understanding and refining your expressive capabilities. The combination of the right materials and a disciplined approach to techniques will unlock your ability to create truly captivating and expressive art.
For those eager to dive even deeper, comprehensive guides exist that cover every element from structure and gestures to perspective, equipping you to confidently capture the subject's form. This article has focused on the tactile materials and fundamental processes, but remember that the broader context of figure drawing, its history, philosophy, and diverse applications, is a rich field of study. To explore the wider world of figure drawing and all its nuances, including more advanced concepts and historical context, delve into our comprehensive guide: All About Figure Drawing. Keep practicing, keep observing, and most importantly, keep enjoying the beautiful challenge of the human form.