Ever found yourself staring at a blank page, yearning to draw compelling characters or vibrant scenes, only to feel your confidence crumble when faced with the human form? You're not alone. The journey into Fundamentals of Figure Drawing often begins with enthusiasm, but quickly hits roadblocks like stiff poses, wonky proportions, or drawings that feel flat and lifeless.
But what if you could move past simply copying what you see, and instead, truly understand the human figure, making it an intuitive tool in your artistic arsenal? This guide will break down the foundational principles, demystifying a subject often considered daunting, and equipping you with the essential knowledge to bring dynamic, believable figures to life.
At a Glance: Your Roadmap to Confident Figure Drawing
- It's About Understanding, Not Copying: Learn to see and simplify, not just replicate.
- Start with Energy: Master gesture drawing to capture movement and flow.
- Build in 3D: Construct figures using simple forms (beans, boxes) to give them volume and depth.
- Know Your Landmarks: Use key anatomical points for accurate proportions.
- Measure with Purpose: Apply systematic methods to ensure believable scale.
- Light Defines Form: Employ shading to make your figures feel solid and dimensional.
- Practice with Intention: Develop smart study habits that accelerate your progress.
Why Figure Drawing Is Your Artistic Superpower
Learning to draw the human figure is arguably one of the most transformative skills an artist can acquire. It's not just for those aspiring to be portrait artists or fine artists; it's a foundational discipline that sharpens your eye, trains your hand, and teaches you universal principles applicable to any subject.
Think about it: the human body is a marvel of complex, articulated forms, capable of an infinite range of motion and expression. When you learn to simplify and construct this complexity, you develop an invaluable ability to:
- Create dynamic characters for animation, illustration, and comics.
- Design believable creatures and imaginary beings.
- Inject life and movement into any scene.
- Understand perspective and volume in a deeply intuitive way.
Many artists get "stuck," focusing too much on surface details before grasping the underlying structure. This often leads to drawings that look technically precise but lack energy, depth, or anatomical accuracy. The true power lies in understanding how the body moves, twists, and exists in space.
The Unspoken Language of Movement: Mastering Gesture
Before you even think about muscles or bone structure, your first mission in figure drawing is to capture the essence of a pose. This is where Gesture drawing comes in – it's all about rhythm, motion, action, flow, and posture. It's the lifeblood of your drawing, the initial spark that communicates energy before any detail is rendered.
Imagine a dancer mid-leap. You don't immediately notice the precise curve of their bicep; you feel the sweeping arc of their body, the tension, the grace. Gesture drawing aims to put that feeling onto paper.
How to Practice Gesture:
- Time is Key: Work quickly! One-minute sketches are common, but you can also try 30-second or 2-minute poses. The time limit forces you to simplify and prioritize.
- Focus on the Big Picture: Don't draw individual limbs. Instead, try to capture the main line of action that flows through the entire body. Think of it as a loose, dynamic scribble.
- Emphasize Opposing Forces: Notice how the shoulders often tilt one way while the hips tilt another. This "contrapposto" creates balance and dynamic tension.
- Feel the Pose: As you draw, imagine yourself taking on the pose. What muscles are engaged? What direction is the weight moving?
Gesture sketches are rarely "finished" drawings. Their value is in training your eye to see movement instantly and translating it into a fluid, energetic foundation for your more detailed work. They are the quick shorthand for capturing life itself.
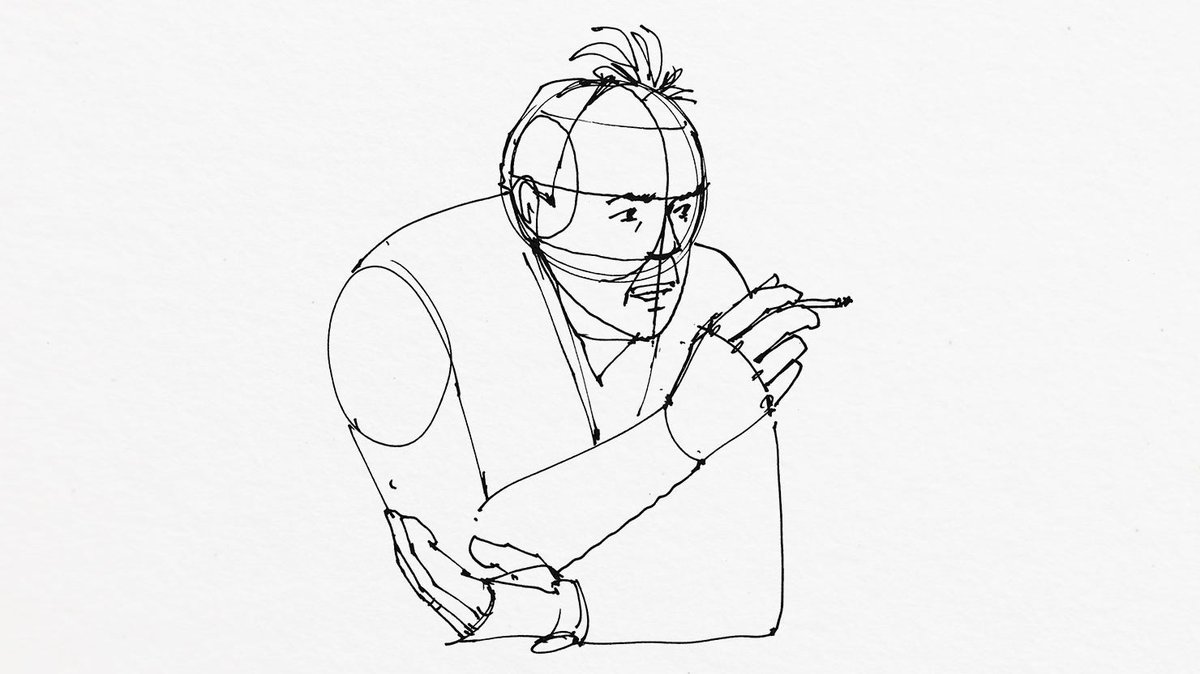
Building in 3D: From Simple Forms to Articulated Mannequins
Once you've captured the gesture, the next crucial step is to give your figure volume and a sense of existing in three-dimensional space. This is where construction comes in, simplifying the complex human form into basic, manageable shapes. This isn't just an exercise; it's how you learn to invent poses from imagination and understand how light will fall on the forms.
The Bean: Your First Step to Dynamic Torso Movement
Think of the torso as two main masses: the rib cage and the pelvis. The Bean concept simplifies these into two rounded, organic forms connected by a flexible "spine." This simple tool is incredibly effective for identifying and drawing the tilting, leaning, twisting, and foreshortening of the body.
- Rib Cage vs. Pelvis: Visualize these two "beans" moving independently. When the body bends, one bean compresses while the other stretches.
- Line of Action: The "spine" connecting them follows your initial gesture line, showing the core movement.
- Twist and Turn: The bean helps you visualize the rotation of the torso, indicating which way the chest and hips are facing.
Robo Bean: Adding Structure and Orientation
Building on the organic "Bean," the Robo Bean takes construction a step further by representing the body with boxes or simpler geometric forms. This technique helps you find the figure's orientation in space and visualize it as a truly 3D form.
- Box for the Torso: Envision the rib cage and pelvis as simplified boxes. This immediately gives them planes and corners, making it easier to understand perspective and foreshortening.
- Cylinders for Limbs: Arms and legs become basic cylinders or tapered tubes. This helps you think about their volume and how they attach to the main body masses.
- Head as a Sphere/Box: The skull can be a sphere, and the jaw a simple block.
By thinking in terms of these simpler 3D shapes, you start to understand how light will interact with the figure and how to rotate it in space from any angle. It’s a vital bridge between flat lines and volumetric forms.
Mannequinization: The Art of Inventing Poses
With the Bean and Robo Bean in your toolkit, you can now progress to Mannequinization. This technique takes your understanding of volume and perspective and allows you to build a believable figure from scratch, truly giving your drawings volume and depth. It's the foundation for animating characters or sketching dynamic action scenes from your imagination.
- Connect the Forms: Use spheres for joints (shoulders, elbows, knees, hips) and cylinders for the bones between them.
- Overlap and Foreshorten: Because your mannequin exists in 3D, you'll naturally start to see how parts overlap and foreshorten as they recede into space.
- Practice Inventing: Challenge yourself to draw figures in various poses without reference, relying solely on your understanding of these articulated forms. This is where your creative freedom truly begins.
Many seasoned artists recommend diving deeper into these structural concepts. For a more exhaustive exploration, you might consider a complete guide to figure drawing that covers these building blocks in extensive detail.
Anatomy for Artists: Knowing Your Landmarks, Not Just Memorizing
Let's be clear: you don't need to be a medical doctor to draw great figures. The goal of Anatomy Primer in figure drawing is not to memorize every single muscle and bone, but to identify Landmarks. These are key areas where the bone is close to the surface, visible, or palpable. They act as crucial anchor points for finding forms, measuring proportion, and ensuring your figure feels believable and structured.
Key Landmarks to Look For:
- Skull: Chin, cheekbones, brow ridge, top of the head.
- Torso: Collarbones (clavicles), sternum, rib cage (especially the lower border), iliac crest (top of the pelvis), ASIS (anterior superior iliac spine – the pointy bits at the front of your hips), pubic bone.
- Upper Limbs: Acromion process (point of the shoulder), epicondyles (knobs on either side of the elbow), wrist bones (ulna and radius).
- Lower Limbs: Greater trochanter (point on the side of the hip), patella (kneecap), tibial tuberosity (bump below the kneecap), malleoli (ankle bones).
These landmarks help you orient your figure, maintain consistent proportions, and identify changes in form as the body moves. They give your figure a structural armature, preventing it from looking like a deflated sack. By understanding these points, you can more accurately measure and construct the figure around them.
Mastering Proportions: The Art of Accurate Measurement
Even with dynamic gestures and solid 3D construction, a figure can still look "off" if its parts aren't in harmonious relation to each other. This is where Proportions come into play—the study of the relative size of body parts. While variations exist, understanding typical human proportions provides a vital framework.
One notable approach is Dr. Paul Richer’s scientific measuring system, often used in professional figure drawing courses. This system, and others like it, provides practical guidelines for measuring various parts of the body using units (often the head-length) to achieve accurate and consistent results.
Practical Tips for Proportional Accuracy:
- Head-Lengths as Units: A common method is to divide the body into 7 to 8 head-lengths. This provides a quick way to gauge overall height and placement of key features.
- Comparative Measurement: Instead of just guessing, actively compare. "How many heads wide is the torso?" "Is the arm longer than the leg?" Use your pencil as a measuring tool against your reference.
- Negative Space: Pay attention to the shapes created around the figure. These "negative spaces" can often reveal proportional errors or help you accurately place limbs.
- Observe, Don't Assume: Our brains often "fill in" what we think we know about anatomy. Actively observe your reference and measure rather than drawing from memory too early.
Proportional accuracy makes your figures believable and prevents common issues like arms that are too short, heads that are too big, or torsos that are too long. It's a skill developed through diligent observation and systematic practice.
Bringing Forms to Life: The Magic of Shading
You've captured the gesture, built the form in 3D, established accurate proportions, and placed your landmarks. Now, to make that figure feel truly solid and alive, you need to understand Shading. Shading is the use of light and shadow to create the illusion of three-dimensionality on a two-dimensional surface. It gives your figure weight, volume, and helps define its form.
The Anatomy of Light (and Shadow):
- Highlight: The brightest spot, where light hits the form directly.
- Halftone: The mid-range tones, where the surface is turning away from the light.
- Core Shadow: The darkest part of the form, where light cannot reach.
- Reflected Light: Light bouncing off surrounding surfaces and subtly illuminating the shadow side of the form.
- Occlusion Shadow: The darkest shadows, found where two forms meet or where a form casts a shadow directly on itself.
- Cast Shadow: The shadow an object casts onto another surface.
Understanding these elements allows you to apply light to form in a convincing way. When studying figure drawing, mediums like charcoal are particularly effective for learning shading, as they allow for a wide range of values and expressive marks, enabling you to map shadows and build up form effectively.
Tips for Effective Shading:
- Simplify Light Sources: Start by identifying the dominant light source.
- Block in Big Shapes: Don't get lost in tiny details. First, block in the major areas of light and shadow.
- Turn the Form: Think about how the surface of the body turns away from the light. Where is it catching light, and where is it receding into shadow?
- Gradual Transitions: Master the subtle gradations between values to create smooth, rounded forms.
- Focus on Form, Not Just Outline: Shading defines the internal structure and volume, not just the edges.
Overcoming Common Frustrations: Troubleshooting Your Figure Drawings
Even with a solid grasp of the fundamentals, every artist encounters challenges. Here are some common frustrations and how to approach them:
- "My figures look stiff and lifeless."
- The Fix: Go back to gesture. Spend more time on quick, energetic sketches. Over-focusing on accuracy too early can kill the life. Think about the line of action first and foremost.
- "My proportions are always off."
- The Fix: Dedicate specific practice sessions to comparative measurement. Use reference photos where you can draw directly over them to check your work. Consider using proportional measuring systems (like the head-length method) consistently.
- "My drawings feel flat, not 3D."
- The Fix: Revisit construction. Are you thinking in terms of "Robo Beans" and cylinders? Are you deliberately showing overlaps and foreshortening? Practice drawing figures from extreme angles to push your understanding of volume. Also, focus on applying the full range of values in your shading.
- "I can't invent poses from imagination."
- The Fix: This is a common hurdle! It means your mental library of 3D forms needs more development. Practice drawing the "Bean" and "Robo Bean" in various twists and turns without reference. Use simple wooden mannequins or 3D apps to help you visualize complex poses. The more you build the figure from simple forms, the easier it becomes to manipulate them in your mind.
- "I get lost in details too soon."
- The Fix: Establish a clear drawing process: 1) Gesture, 2) Construction, 3) Proportions/Landmarks, 4) Major Shadow Shapes, 5) Refine Details. Stick to this sequence. If you catch yourself adding an eyeball before the head is properly constructed, stop and go back.
Remember, every "mistake" is a learning opportunity. The best way to improve is to identify the specific problem, then target your practice to reinforce that particular fundamental.
The Importance of Practice and Study Habits
Mastering the fundamentals isn't a one-time achievement; it's an ongoing journey fueled by consistent, intentional practice.
- Draw from Life: Attend open figure drawing sessions if possible. Nothing beats drawing from a live model.
- Use High-Quality Reference: Websites and apps offering timed figure poses are excellent resources for daily practice. Look for references with good lighting to practice shading.
- Analyze Masterworks: Study how artists you admire have handled the human figure. How did they capture gesture? How did they simplify forms?
- Critique Your Work (and Others): Learn to objectively identify areas for improvement. Looking at common mistakes in student critiques can often illuminate issues in your own work.
- Embrace Nudity in Study: It's worth noting that the study of the human body for artistic purposes traditionally, and often still, involves drawing from nude figures. This isn't for shock value; it's because clothing obscures the underlying structure, movement, and anatomical landmarks crucial for understanding form. Approaching it as an academic study helps you see beyond societal conventions to the pure sculptural beauty of the human form.
Your Next Step: Draw, Observe, Learn
The Fundamentals of Figure Drawing are not just a list of techniques; they are a way of seeing. They train your eye to perceive the world in terms of movement, volume, and structure. By committing to these foundational principles—gesture, 3D construction, anatomy, proportion, and shading—you're not just learning to draw people; you're developing a profound understanding of form that will elevate all aspects of your art.
So, grab your sketchbook, find a comfortable spot, and start drawing. Observe the people around you, paying attention to their posture, their weight distribution, the subtle twist of a torso. Every moment offers a lesson. The path to confident figure drawing is paved with curiosity, persistence, and the joy of creation. Don't just copy the figure; understand it, and watch your artistic world open up.